All You Need to Know to Perfectly Combine Live Drums and Loops
One very powerful technique to increase the impact of your drums is to combine live drums and loops. Teaming up the organic performance of a drummer with the sonic possibilities of a loop opens the door to endless possibilities. But it’s not all peaches and cream. Many a producer has slapped a loop on top of a drum performance just to find that it made his track sound worse.
Read on and find out how you can combine live drums and loops to create that impactful drum sound that will blow your listeners away!
1) Work the timing
If you load a loop into your live drum session, I bet the beats will not line up perfectly. Unfortunately, our ears are really good at detecting transients that are out of sync.
So the first step to success is lining up your drum loop perfectly with your live drum performance. Here’s what you need to do:
Extract the groove from your drummer’s performance
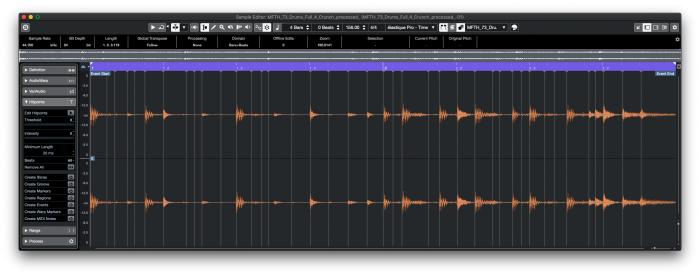
In order to match the timing of loop and live drums you first must extract the drummer’s performance. Your DAW needs to know whether her hits are spot on, laid back or slightly ahead. In Pro Tools you would use Beat Detective for this task. In Cubase, the Hitpoints tab in the sample editor offers a ‘Create Groove’ functionality. If in doubt, check your favourite DAW’s manual!
The extracted groove template will contain information about your drummer’s natural timing variations.
Quantize the loop
Now it’s time to impose your drummer’s timing variations on the loop you imported. Depending on whether you work with an audio or a MIDI loop the workflows will be slightly different, but the idea is the same.
Workflow for audio loops
Before you quantize the audio loop, verify that its transients have been detected properly. In Pro Tools you will want to check the analysis view on an elastic audio enabled track. In Cubase, it’s the Hitpoints tab of the sample editor that will help you.
Afterward, call the audio quantize function of your DAW and make sure you tell it to quantize to the groove template you extracted in the previous step. You don’t want to quantize to a fixed grid, the goal is imposing the timing variations of your drummer on the loop.

The quantize panel in Cubase. Note that I selected a previously extracted groove (80s Hip Hop…) and enabled AudioWarp quantization.
Quantizing a MIDI loop to the groove template
If you’re working with a MIDI loop life will be a bit easier. Again, you’ll need to quantize the loop using the groove template as a reference. But this time you don’t need to worry about transient detection! Simply call the quantize function of your DAW, load the groove template of your drummer’s performance as a reference, and hit apply. Everything should snap nicely into place!
Time to get your hands-on
As good as automated quantizing workflows are – sometimes they get it wrong. This can happen especially if your drum loop contains rhythmic accentuations that differ from the ones that your drummer uses. If she only played eighth notes but your loop contains a lot of sixteenths, your DAW will have no idea about how to align those extra hits!
In this case, first do a quantization pass and then work beats that need help manually. Put the loop and the live performance tracks on top of each other for easy visual referencing and start chopping and moving things around. If you’re working with an audio loop don’t forget to cross-fade!
At the end of this step, your loop and the live drums should play perfectly in sync!
2) Work the mix
Aligning the timing of loop and live drums is only half the work. On top of fitting in rhythmically, your loop needs to fit in sonically as well. Here are two techniques that will help you achieve this goal.
Work the equalizer
Equalizing your loop is the most powerful way to make it fit sonically in the mix.
Accentuate the frequencies that emphasize the loop’s contribution and reduce the gain of those frequencies that conflict with the live performance. Two examples:
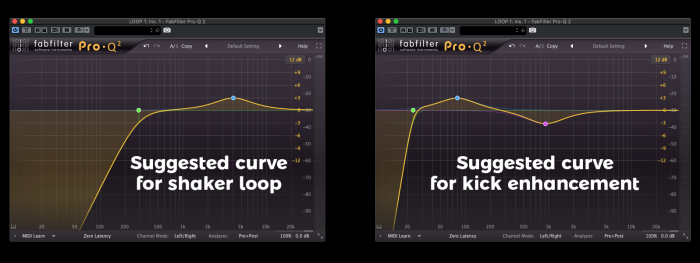
- If you added a shaker loop, accentuating 3-5 kHz (more presence) and cutting everything below 300 Hz (less mud) will make it sit better.
- If you used a kick loop to enhance the impact in certain spots, make sure you boost the area between 60 and 100 Hz. Look carefully at the midrange of the loop and reduce any frequencies that clog up the mix.
Work the dynamics
After adjusting frequencies it’s time to look at the dynamics of your loop. Ideally, it should have a similar dynamic range to the live drums. The way to get there is to use compressors (to reduce) or expanders (to increase) the dynamic range of your loop.
Multiband compression can be really valuable here, especially if you’re working with an audio loop that you can’t deconstruct into individual elements anymore. Let’s suppose your loop has a matching dynamic range in the mid and high frequencies, but the kick is out of bounds. A multiband compressor tackling just that low end is just what the doctor ordered to sort this out.

In this multiband compressor, only the first band is set to work. All other bands operate on unity gain.
Last but not least, experiment with sidechain compression to make the loop vary its dynamics a bit based on the rhythm of the live drums. Example: Use the live kick as side chain input for the entire loop. On each kick drum hit, the volume of the loop will reduce slightly, creating an oscillating motion that’s perfectly in sync with your live drums.
That’s my tip for the day – thanks for reading. Combine live drums and loops in your next production and let me know how it works for you!
About Norbert
Norbert is a sound designer, composer, and engineer. He’s always up for a geeky chat about audio, so say hello to him on Insta (@norbertweiher) or head over to norbertweiher.com to check out his work.
Audio Production


LEAVE A COMMENT