The 21 Most Important Synthesizer Parameters in One Blog Post
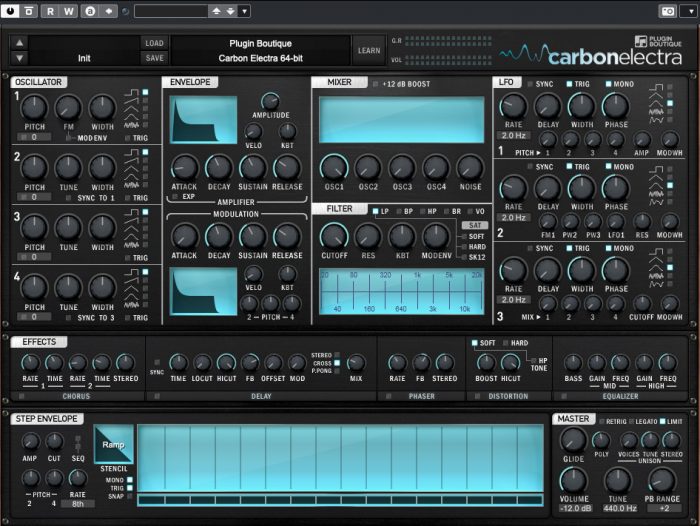
In today’s post, you’ll program a synth patch with me. My objective is to show you how to shape a patch with the 21 most important synthesizer parameters.
You’ll hear examples of each programming step, and there are plenty of screenshots showing the parameters I tweaked.
So let’s go and program some patches!
Oscillators and mixer
Oscillators are the heart of a subtractive synth – always start your programming here.
The following four parameters are by far the most important ones to tweak:
- The wave shape defines the timbre. Sine, triangular, square, and sawtooth are the most common ones, but your synth may offer more. Experiment and get a feel how the different waveforms sound like! Most synthesizers offer a noise generator which comes in handy when creating percussive sounds or aggressive leads.
- Course and fine tune are used to get each oscillator in the right pitch range. You can create interesting patches by tuning different oscillators to different musical notes. Popular interval choices are the perfect fifth (+/- 7 semitones) or fourth (+/-5 semitones). With the fine tune control you can create interesting chorus effects!
- Unison creates various copies of your oscillator(s) and detunes each one slightly. Switch unison on to make your patch instantly sound fatter.
- With the volume/mixer controls, you dial in the right volume balance between oscillators and noise generators.
Let’s hear the oscillator section in action.
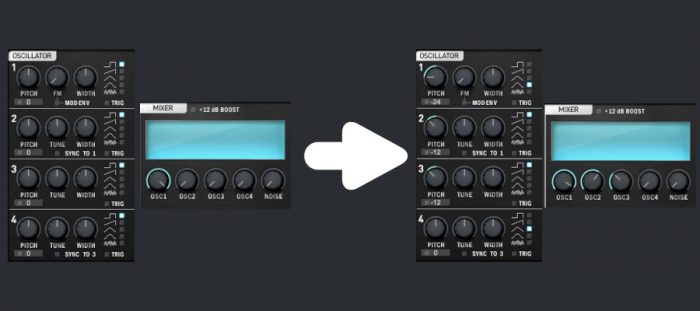
The first example is the init patch of my synthesizer.
Not very interesting yet, so in the next example, I’ve added more oscillators, used different wave shapes, and tuned the oscillators differently.
Note how switching on unison on the second oscillator makes the patch instantly fatter:
Amplifier
You’ve defined your basic sound with the oscillators. At this stage, your patch will still sound very static – what’s missing is movement! Introducing volume changes over time is the first step to fix this.
With the amplifier section, you will accomplish this task.
Almost any synth shapes the volume of each note with four parameters – attack, decay, sustain and release. This is where the famous acronym ADSR comes from!
- Attack defines how fast the sound rises to its loudest volume. A slow attack is good for creating string sounds or pads, a fast attack for percussive sounds like kick drums.
- Decay defines how long it takes to lower the volume until it reaches the sustain level. Again, long decay times work well for strings and pads. Short times are great for percussions.
- Sustain controls the volume level after the decay phase is over. Turn it all the way down if you want to create a percussive sound (use fast attack and decay as well). Higher values are great for leads and pads.
- Release defines how long it takes for the sound to fade out after releasing the key. A crisp lead will have short release times, so it doesn’t clog up the mix. For pads or strings, long release times sound great, blending the different notes nicely into each other.
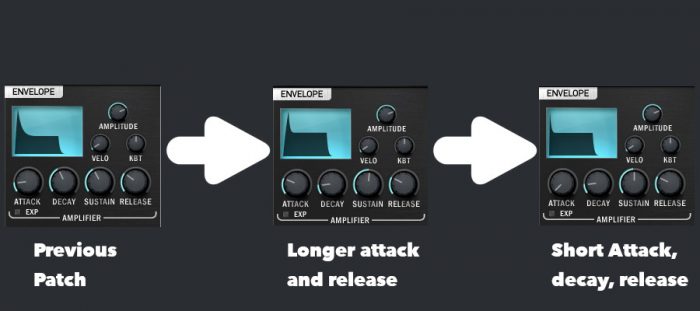
See how the next two patches compare to the previous example.
The image shows which parameters I’ve changed!
Filter
After tweaking the amplifier, your patch definitively sounds more interesting. But the timbre is still static – it would be great if it would evolve over time. The filter, LFO, and step filter modules will help you to create such movement.
By removing frequencies, the filter further shapes the timbre. The first controls you should tweak are these:
- Filter type: Some synths will offer a wide selection of filters (high-pass, low-pass, band-pass, band-reject…). Others may have only a low-pass filter available – which is by far the most commonly used type. Try out all filter types to get a feeling for how they sound!
- Cutoff frequency: This parameter defines the frequency at which the filter will begin to work. Let’s use a low-pass filter as an example. Reducing the cutoff will roll off more and more harmonics, leaving you with a more muffled sound. As you increase the cutoff frequency, harmonics will start to appear, and the patch will sound brighter.
- Resonance: This parameter increases the gain of frequencies right before the cutoff. A resonant filter has a very characteristic ringing sound. After finding the right cutoff frequency, play with the resonance to get the sound you want.
In the next two examples, you’ll hear a low-pass filter in action – first without, then with resonance.
Compare with the previous patch above (no filter)!
Filter envelope
The filter envelope varies the cutoff frequency with time using an ADSR curve.
Here’s a great way to familiarize yourself with how this sounds like:
- Use exactly the same values for attack, decay, sustain and release that you used in the amplifier module. The filter cutoff will now follow the volume ADSR curve as you play each note.
- The modulation depth defines the direction and intensity of the cutoff variation. Positive values let the filter cutoff first increase and then decrease. Negative values cause the opposite effect. Use large values for an intense variation or values close to zero for more subtle changes. If you set the modulation depth to zero, your filter envelope won’t do anything.
- Once you found the sweet spot for the modulation envelope, experiment with how changing the ADSR curve influences the timbre.
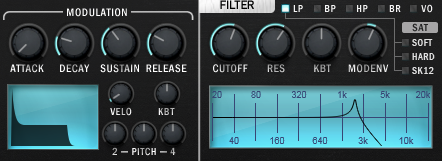
In the next example, I’ve used the mod envelope to modulate the filter cutoff frequency with time.
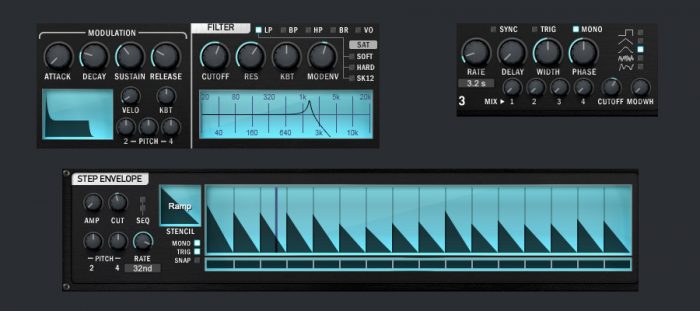
Note the slightly positive value for MODENV in the filter section!
LFOs and step sequencers
With LFOs (short for low frequency oscillators) and step sequencers, you can modify a wide range of parameters and thus create a series of interesting effects. LFOs create periodic movements, and step sequencers introduce rhythmic changes based on the tempo of your song.
The exact mechanics depend on your synth, but the general procedure looks like this:
- Define the modulation you want to implement. For LFOs, you select a wave shape and a frequency. For step sequencers, you define the intensity of each modulation step. You’ll also need to define how the step sequencer synchronizes with the tempo of your session.
- Target a parameter. Some synthesizers give you total freedom over which parameters you wish to modulate. Others give you a fixed set of modulation possibilities. Looking at the manual to find out what is possible is a great idea at this point. Here are some ideas to get you started:
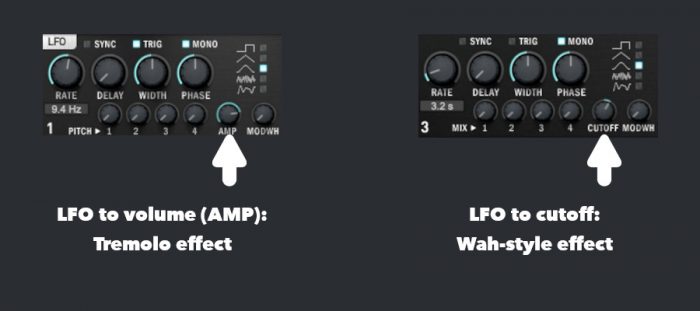
- To create a tremolo, target the main volume with an LFO.
- For a vibrato, target the main tuning with an LFO.
- For a wah-style filter effect, use a low-pass filter and target the cutoff frequency with an LFO. You can mix this with the filter envelope to create even more complex filter movements.
- Want your synth to play a melody each time you press a key? Use a step sequencer and set each step to a different interval.
- Define the intensity of the modulation. Again, the way this is done depends on the synth you are using, so if you’re in doubt, have a look at the manual.
In the next two examples, I’ve created a tremolo and a wah-style filter effect.
In the next example, I go completely crazy, mapping an LFO, the mod envelope, AND the step sequencer to the filter cutoff…
Effects
Nowadays, almost any synth comes loaded with effects. The most common ones are reverb, delay, and chorus/phaser/flanger. More complete synths offer distortion, bit crushers, ring modulators… the list is endless.
As useful as effects are… I recommend switching them off and creating your basic patch using only the ‘classic’ synth controls mentioned above. Once you’re happy with your work, play around with the effects at your heart’s desire and see how far you can push the sound!
Here’s the last patch with a good added dose of chorus, delay, and distortion.
Two final tips
- A synth on its own sounds great in stereo. However, in the mix, stereo synths generally occupy too much space. This is why Björgvin the Great himself recommends working with mono synths.
- This post is a great complement to my post on intuitive synth programming.
About Norbert
Norbert is a sound designer, composer, and engineer. He’s always up for a chat – say Hello on Insta (@norbertweiher) or head over to norbertweiher.com to check out his work.
Audio Production, Keeping Track




LEAVE A COMMENT